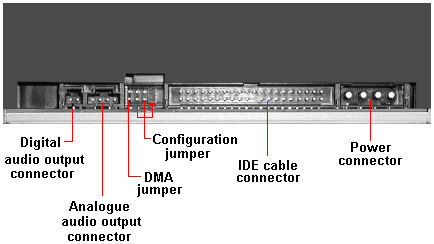
As well as configuration jumper blocks, the back of the CD-ReWriter has a number of connectors.
Each of these will need to be connected to the appropriate location on the motherboard, or to a motherboard expansion card.
Power connector:
Connect a large 4-pin white connector from the power supply to the drive’s male 4-pin power connector.
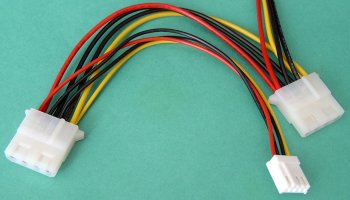
Note, the computer’s power cable connector and the drive’s power receptacle are keyed. Inserting the power cable connector improperly will damage the drive.
IDE connector:
The IDE cable connector is connected to an IDE cable.
An IDE ribbon cable has three plugs – one for the motherboard and the other two for the connected drives. These days they’re colour-coded; the blue connector goes into the motherboard, the black connector – furthermost away from the blue end – is for master drive and the grey connector – in the middle – is for the slave drive. Most cables are keyed, to prevent them being fit the wrong way round. In the absence of a key, the rule is that the red (or blue) line always goes next to pin 1.
Since the advent of ATA/100, two types of cable have existed, one having twice the number of wires as the standard type. This 80-conductor cable puts a ground pin between each control and data signal, thereby improving signal reliability.
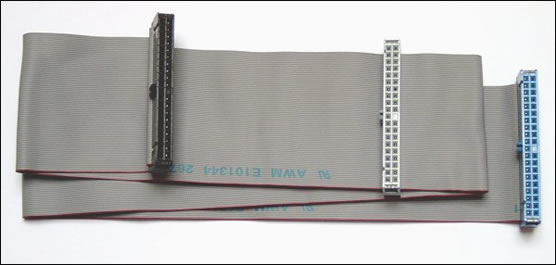
Take care to avoid plugging your IDE ribbon cable upside down into either your drive or motherboard. For correct orientation, match the red stripe along one side of an IDE ribbon cable to Pin 1 on the motherboard and Pin 1 – the pin closest to the power connector – on the drive. Each connector on the ribbon cable has a key in the middle. This key should fit into a slot in the middle of each connector of the motherboard and internal IDE peripherals.
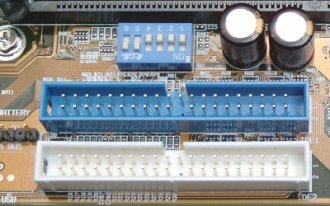
The blue connector is connected to one of the two motherboard IDE connectors and either of the grey or black connectors connects to the internal IDE drive.
Before the CD-ReWriter is connected careful consideration is required, both as to which of the IDE channels to connect it to and how it should be configured – as master or slave – on the chosen channel.
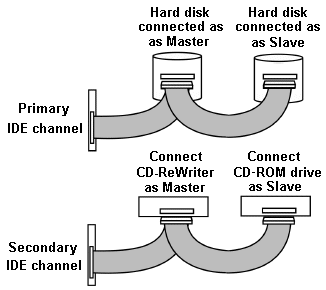
In this case the current IDE configuration is two hard disks connected as Master and Slave devices on primary IDE port, and a CD-ROM drive connected as Master device on the secondary IDE port.
The manufacturer’s favoured configuration was to have the CD-ReWriter as Master on the secondary IDE channel, with no drive connected to the other connector. Since this wasn’t possible, an alternative recommendation – to re-connect the CD-ROM drive to the secondary IDE port as the Slave device and connect the CD-ReWriter as to the same IDE channel as Master – was followed.
Since the IDE cabling is easier if the Master drive on a particular IDE channel occupies a drive bay above the Slave drive. In this case the existing CR-ROM drive was relocated so as to allow this.
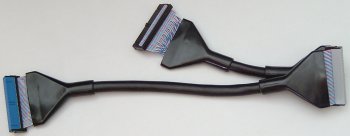
In fact, we’re using rounded IDE cables here. These have been around for a few years and have found favour with the PC modding community because they look a lot better than conventional ribbon cables.
They won’t improve the performance of your system, but they may well allow it to run cooler as a result of improved airflow around your system. They’re much easier to install than regular ribbon cables, bending and twisting more freely and being easier to fasten down with cable ties.
Although a single IDE channel can handle two connected devices, it’s important to understand that these share the channel, which can only process a single request at a time. This means that when one device is active, the other is, by definition, inactive. In the event of two requests being made simultaneously, an IDE controller will give precedence to that made by the primary device. Furthermore, the chipset on some older systems will not support independent timing, with the result that both devices connected to an IDE channel will run at the speed of the slowest.
These factors need to be taken into account in determining which configuration of multiple IDE/ATA devices will maximise your overall system performance.
The most common 4-drive scenario is:
- hard drive 1
- hard drive 2
- CD-ROM drive
- CD-(Re)Writer drive
The first hard disk drive should always be configured as the primary master.
In the past, the conventional wisdom was that the way to minimise making coasters was to have the CD-ROM and CD-Writers on different channels, and to configure the CD-ROM drive as a master. For older systems this may still be an important consideration. However, it’s less relevant for more modern systems, and especially those that include a CD-Writer that supports one of the several technologies now available for avoiding buffer underruns.
On the assumption that the hard drives are likely to be the fastest devices, perhaps a more appropriate rule is to allocate these as the primary devices on each of the IDE channels unless you have a dual-boot system, in which case they should be configured as master and slave on the primary channel.
The bottom line is that there’s no one single configuration that is optimal for everyone. You simply need to figure out what arrangement will work best for you, and perhaps refine this by trial and error. In truth, the more modern your system, the less likely is that the way in which you configure your IDE channels will make an appreciable difference to performance.
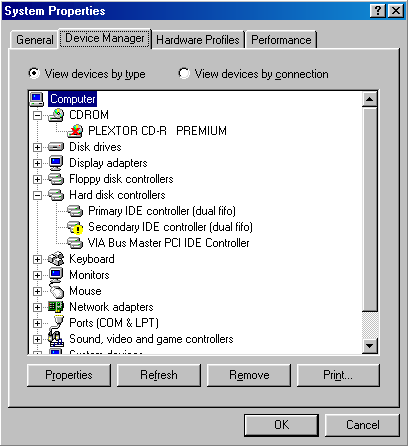
Sadly, for some reason that must forever remain a mystery, it proved impossible to get the CD-ReWriter/Master, CD-ROM drive/Slave configuration to work!
Nothing – including updating the motherboard’s chipset drivers – would get the CD-Writer to be recognised as secondary IDE channel Master.
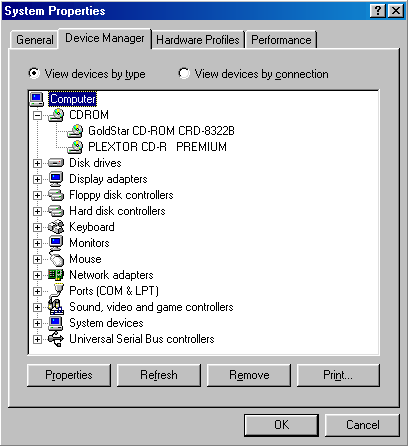
Only by switching the drives’ Master/Slave designations – and so physically switching the drives’ bay positions too! – was it possible to get Windows 98 to recognise both drives properly.
Audio connector:
If appropriate, you may connect the CD-ReWriter’s analogue audio output connector to an audio amplifier or a sound card’s internal audio input connector using a sound cable terminated with a standard MPC-3 type, 4-pin connector.
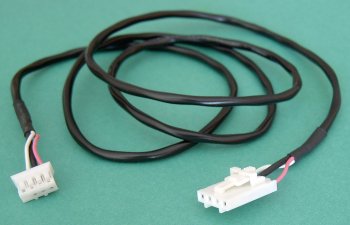
Often, retail optical drive products will include such a cable. The larger connector connects to the CD-ReWriter.
An alternative audio option – and one that will provide purer sound than the analogue audio connector – is to connect the CD-ReWriter’s digital audio output connector to a sound card that supports Sony/Philips digital interface (SPDIF) or Digital-In, using an audio cable terminated at both ends with a 2-pin Molex connector.
It’s not uncommon for retail optical drive products to include an analogue audio cable. However, if you require one of the other types of cable shown in the table below, you’ll need to purchase it separately:
| Audio Connection | Cable required | How to connect it |
|---|---|---|
| MPC audio source | MPC-compliant audio cable | Connect to MPC audio source, and to analogue audio output connector at the rear of the drive. |
| Sound Blaster-compatible analogue audio cable | Connect to Sound Blaster-compatible sound card and to analogue audio output connector at the rear of the drive. | Connect to Sound Blaster-compatible sound card and to analogue audio output connector at the rear of the drive. |
| Digital audio output | Cable that’s compatible with SPDIF or Digital-In. | Connect to SPDIF or Digital-In connector on sound card (if sound card supports digital audio) and to digital audio output connector at the rear of the drive. |
In the absence of a sound card, a motherboard with integrated sound will provide at least an analogue audio connector, typically labelled as a CD-IN Connector
- Drive Installation Terminology
- CD-RW Installation Intro
- CD-RW Installation Configuration
- CD-RW Installation Mounting
- CD-RW Installation Connection
- CD-RW Installation Bios Setup
- CD-RW Burning Software
- CD-RW Installation Optimization
- Floppy Installation Intro
- Floppy Installation Mounting
- Floppy Installation Connection
- Floppy Drive Installation BIOS Setup